
 For government bike rack installation programs, the optimal rack is:
- Staple-style rack
- 27″ long
- 33″ tall
- 1.5″ gauge ASTM A53 Grade B Standard Weight Steel Pipe, preferably square stock
- Brightly painted
- Installed correctly into concrete
 For private bike rack installations, a rack made of higher quality materials may be more attractive for installation. Despite higher upfront costs, these racks may have long-term cost savings through reduced maintenance. One high quality staple rack that we recommend is the Tofino Staple Rack made by Sportworks.
Detailed Rack Recommendations
Proper Locking Technique
The right design encourages proper locking technique — and proper locking technique also determines our recommended rack design. For a typical bicycle, the proper locking technique is to use one U-lock to lock the bike frame and the front wheel of a bike to the rack’s vertical post, with the bike’s seat post leaning against the opposite side of the bike rack. By locking the front wheel and having a second point of contact at the seat post, the bike is very stable on the rack and less prone to motion and damage if bumped. If the bicyclist wants added security, the bicyclist may use a cable lock or second U-lock to secure the rear wheel to the bike rack.
Design
Cities should adopt the “staple rack,” also known as the “sheffield rack” or “inverted U rack,” as the default rack design permitted for city bike parking installation programs, new private development projects, and city parks. If businesses wish to purchase and install their own racks, developers and businesses should be allowed to install similarly functioning bike racks that meet similar specifications, such as “circle racks” or “triangle racks.”

Sizing
Length
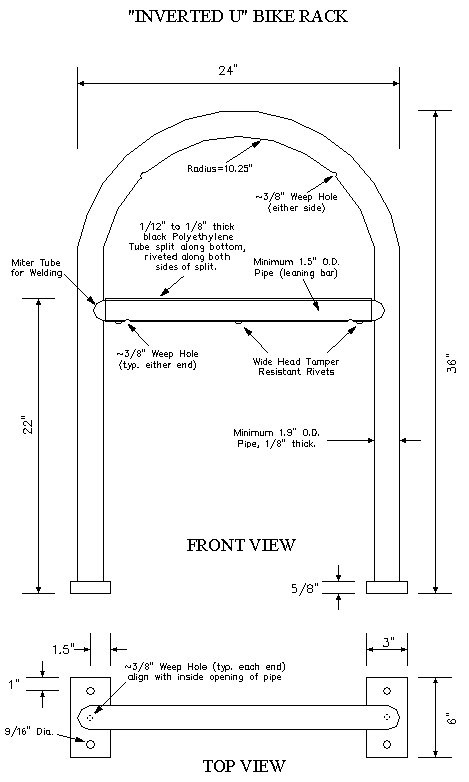
The length of the bike rack should be 27 inches long (24-30 inches allowable), measured 18 inches from the ground.
Each rack should provide parking for two standard bikes parked on opposite sides of the rack in opposing directions. At 24-30 inches long (27 inches is preferred), the handle bars of each bike should be able to be “behind” the other bike’s seat. There is no reason to have a longer bike rack than 30 inches.
A rack that is not long-enough will provide inadequate support for a bike, increasing the probability the bike will fall over. The rack should be long enough to provide two points of contact, one point where the front wheel is closest to the downtube, and one point at the seat post.
Height
The height of the bike rack should be 33 inches tall (30-35 inches allowable), measured at the center-point of the bike rack’s length.
At 33 inches tall, the bike rack will be slightly taller than most bikes’ top tubes. This means the height of should be tall enough to (1) be above where a U lock would connect the front wheel and the downtube of the frame, (2) be below most bikes’ handlebars and saddles/seats, and (3) provide a second point of contact near the seat post.
A rack that is too short will provide inadequate support for a bike, with the potential for the bike to fall over. In addition, if the rack is too low, it could become a tripping hazard.
Tube design and thickness
Bike rack should use 1.5-inch to 1.75-inch gauge, ASTM A53 Grade B Standard Weight Steel Pipe, preferably square stock. The width of pipe is measured on the inside, so a 1.5″ gauge ASTM A53 Grade B Standard Pipe would be about 1.75 inches, and a 1.75″ gauge pipe would be just under 2 inches in total thickness.
- A rack with tubing that’s less than 2 inches in outside diameter allows for a standard size U-lock to be used with most bikes with rain-guards.
- Uniformity of rack thickness across all racks in the city is preferred in order to assure similar sized U-locks can be used for bikes across the city.
- A square shape tube helps prevent bike theft by making it difficult to use a conventional and easily obtained pipe cutter on the tube.
Material
City bike parking installation programs should use ASTM A53 Grade B Standard Weight Steel Pipe with a hot-dipped galvanization finish per ASTM A123 and hand-ground after galvanization.
The rack should then be primed with a zinc-rich epoxy primer, and powder-coated with a polyester try-glicidylisocyanurate (TGIC) finish that’s 4 mil thick (no less than 3 mil), preferably in a bright color. Developers, businesses, and parks departments may wish to upgrade the appearance of the bike rack by using the more expensive brushed steel or stainless steel materials.
The paint color of the bike rack can establish a clear design uniformity and help create a local color palette. For example, the City of Portland uses the same shade of blue for its racks that its transit agency, Trimet, uses as its primary color for bus stop signs, benches and shelters.

Installation
Racks should be installed directly into concrete by one of the following methods:
- Setting it directly into wet concrete and letting it dry; or
- With screws that cannot be removed, either with (A) breakaway nuts or (B) a weld on the top of nuts and screws, such that the rack cannot be unscrewed from the concrete. Each of the rack’s posts should have at least one breakaway nut or a weld such that a thief couldn’t unscrew one end of the rack.
 In some situations where a property manager may need to occasionally remove a rack, star-patterned screws with a security bead in the middle may be used to secure racks to the sidewalk.
Racks to Avoid & Deny
City agencies, developers, and businesses should not use, and should not the permit the use of, the following racks:
- Coathanger Racks
- Wave Racks
- Spiral Racks
- Wheel Bender Racks
- Front-only loading racks
- Wheel-Well Racks
- Wooden Racks
- Bollard or Post Racks
- Hitch or “Ring & Post” Racks
- Wheel Chocks
- Sidewall Racks
- Art racks that fail to meet recommended specifications.

Horizontal Rails and Artwork / Branding in Middle of Bike Rack
 A horizontal rails or artwork/branding are occasionally added to the middle of a staple-style bike rack for three reasons:
- Security: Some cities, including Seattle, have installed their racks with standard nuts that can be unscrewed very easily. The middle rail creates a loop within which a bicyclist can lock their bike. If a thief unscrews the bolts, the thief will not be able to slide the bike off the rack.
- Branding: Businesses or neighborhood business districts sometimes add branding or other artwork to the middle of the rack.
- ADA: The design code for the American Disabilities Act (ADA) requires that any structure within the pedestrian way that is supported by two poles more than 12″ apart and is taller than 24″ but shorter than 80″ must have something less than 24″ in height in the middle so that a vision impaired person who uses a cane can detect the obstruction.
Unfortunately, many middle horizontal rails and artwork cause difficulty in locking a bike up or result in people improperly locking up to the rack in a way that make the bike unstable or an obstruction to pedestrians. As a result, Bicycle Security Advisors has strongly discouraged the use of middle rails and artwork.
Instead, cities should make their racks safe for locking-up by using security nuts, breakaway nuts, or welds or setting the racks in concrete to ensure their racks can’t be easily unscrewed from the ground. When branding or artwork is desired, we encourage the artwork to either be affixed to the top of the rack instead of the middle, or, if positioned in the middle, be affixed in such a way there’s a 6″ clear zone between the rack’s vertical bars and the artwork (the artwork could be approximately 11″x31″ in size at its maximum).
Not all jurisdictions have interpreted the ADA design code to apply to bike racks, or at least to where bike racks are typically installed along a sidewalk. However, if your jurisdiction requires a middle horizontal rail, we recommend the bar be set 9″ above the ground. The lock-point for locking the front wheel and frame of a bike is at 18″, so having the rail at 9″ ensures the rail will not interfere with bicyclists’ attempts to lock up their bikes. The rail should not be any lower as the ADA design code requires a foot clearance of 9″.
Uniformity
So bicyclists can easily understand how to use racks and so their lock can work for their bike with all racks, agencies, cities, and counties within a region should adopt the same, single acceptable bike rack design. This uniformity of design should be applied to transportation departments’ bike parking installation programs; transportation and planning departments’ approval of bike racks installed by developers and businesses; and parks departments’ racks in parks.
Other Bike Rack Specifications
- Portland Rack – 2016 & after
- Portland Rack – Before the 2016 Update
- Seattle Inverted-U 24″ Rail Rack
- Seattle Alliance for Pioneer Square Rack Specs
- Seattle Alliance for Pioneer Square Rack Description
- APBP Rack Selection Guidelines
- CalTrain Rack Selection Guidelines
- Dero Downtown Rack
- Sportworks Tofino No Scratch Rack
- Sportworks Inverted-U Wide Square Tube Rack
 Rackathon
The above recommendations are based, in-part, on a crowdsourced review of bike racks at a bike parking event for design professionals, agency planners, and bicycle advocates held on July 9, 2014. Participants reviewed the racks based on nine factors (Lockability, Security, Stability, Wheel Protection, Space Efficiency, Accessibility, Inclusivity, Visibility, and Attractiveness) using a scoresheet. The total scores were tabulated and summarized in this spreadsheet. Further refinement of the optimal rack dimensions was conducted by Brock Howell, Bob Edmiston, Victoria Kovacs, Carl Leighty, and Mike Rimoin in follow-up meetings.

